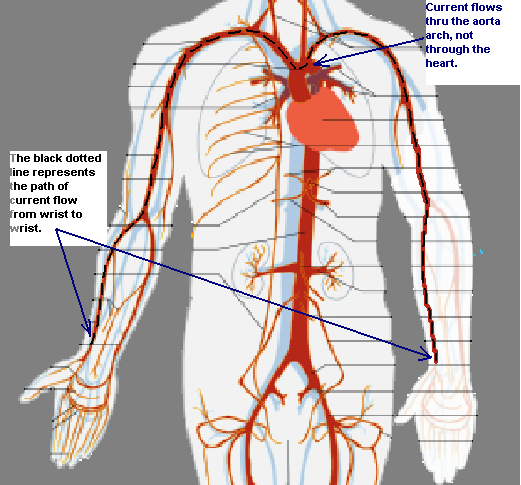
Microbe Electrifier / DC Electrifier usageThe idea behind these instructions is to give you a guideline for amount of usage to match your body's amount of resultant cleansing so that you don't try to do too much too soon and get sick from excess cleansing. The immune system & liver & kidneys will cleanse the blood of deactivated viruses/bacteria/yeast but only at a rate that is unique to you. Therefore you should start out slowly and every week increase usage time if you feel up to it. If you have a Magnetic Pulser then use it first and don't start using the Microbe Electrifier till you stop getting major cleansing reactions from the Pulser (in case of a clogged up lymph system). Microbe Electrifier UsageIt normally takes people 6-8 weeks to complete microbe electrification treatment although circulation impaired people and people with CFIDS, AIDS, and other immune dysfunction diseases often have to progress (increment the usage time weekly) more slowly. Positive Thinking: It may be helpful if you encouraged yourself daily to resist the tendency to become skeptical and give up. Do this by thinking positive thoughts about the new life you'll have once you've regained your health. It will be definitely worth any trouble encountered. Life can be so sweet when vitality brightens every moment of your existence. Microbe Electrifier InstructionsInstall batteries: Remove the back cover using a small phillips screwdriver. Attach four 9 volt alkaline batteries to the battery clips. Be sure not to pull on the battery wires since they are a small gauge wire and not made to be pulled on. Click here to see correct battery placement. Put the bubble wrap on top of them (to keep them from being able to move around) and screw on the lid. To test for proper operation and strength of batteries: Flip the power switch to the ON position and the frequency switch to 4 Hz. Press the Test button down and look at the green test lights to see that they are alternating on and off. (At 16 Hz the lights will mostly stay on). If the four 9 volt batteries need replacement the Test lights will not light at all. To replace the batteries just use a Phillips screwdriver to unscrew the cases bottom 4 screws, pull off the cover, and then pull off the snap clips from each battery so that they can be replaced with new alkaline ones. Reinstall the padding as it was so as to prevent the batteries from rattling when the box is jiggled.Choosing electrode site: Both electrodes on the inside of one wrist is the easiest site for convenient usage, but it affects the least amount of blood and the current has to be turned up to a painful level for enough to flow in the arteries since most of it will just cross over through the muscles. Beck proved that 3mA of current is necessary with this arrangement but no one except for nerve-damaged people can tolerate that high level. Using one electrode on one wrist and the second one on the other wrist is my favorite because plenty of blood is affected. This method causes people to worry about current affecting the heart but the current doesn't go thru it. [drawing] Using the electrodes on both ankles affects the most amount of blood, but will barely allow enough electrical current for some people (due to mineral deficiencies) and is hardest for initiating and maintaining correct electrode placement. Locating electrode placement sites for both wrists: The locations are the inner side of the wrists about 1+1/2 inches below the wrist crease to the outside of the main tendon on the thumb side. Each wrist should have one electrode held in place by one wrist band. (picture) This is the most preferred electrode placement. Locating electrode placement sites for ankles: On the inner side of each foot locate the pulse of the unseen artery between the ankle and the heel. If you can't feel it then go for a brisk walk for ten minutes and then feel for it without elevating your foot. On top of these pulsating arteries are the sites. (picture) Connecting Electrodes: Clean & dry the electrode sites. Soak each of the cloth electrodes thoroughly with tap water or saltwater. Squeeze the middle of the insulation of the Microbe Electrifier's alligator clips (at the end of its wires) so that you open the jaws and then let them bite onto the electrodes ends with one jaw inside the electrode. (picture) Place the electrode over the artery. Then put the elastic band around it and the wrist (or ankle). Don't pull it tight. Just enough stretch to keep it in place is good. If using electrodes on the ankles, then attach them there with 1" wide medical tape. Re-wet the cloth electrode after 1 hour of use. Making Saltwater: Tap water (not distilled or de-ionized) is to be used to wet the cloth electrodes so that they'll be electrically conductive. If you can turn the unit's current control fully clockwise and not get a zing from the electricity then it's probably because your tap water is deficient in minerals which makes it not very electrically conductive. To remedy that you can make some saltwater by putting a couple of shakes of salt from the saltshaker into a cup of water and stirring it. This is very electrically conductive but also corrosive to the alligator clips. Using the device: Clean your skin where you want to place the electrodes and then connect the wet electrodes to you. Turn the current control dial fully counter-clockwise, set the unit to 16Hz, and flip the switch to the ON position. Wait 30 seconds for the circuitry to stabilize and then turn the current dial slowly clockwise until the red current light comes on fully. Then switch the frequency switch to the frequency setting you want to use if it's not 16Hz. The current light will indicate when you are getting at least .14mA (140uA) through your bloodstream. If it won't light at maximum dial position then one of three conditions exist; 1) Your body's salt & mineral level is very low (read this), 2) Where you placed the electrodes is unsuitable, 3) You need to use saltwater on the electrodes instead of tap water. If your body's salt level is low then start salting your food with sea salt (which doesn't cause high blood pressure). If the electrodes 'sting' or 'bite' then 1) the current dial setting is too high, 2) your skin is dirty, 3) you need to relocate the electrodes. Below is a video showing how to wet the electrodes, connect them to your wrists, and then how to turn up the current dial till the red light is fully on. (It is with the simple version of the Microbe Electrifier.) Current Level: The target .14mA is right at the beginning of the effective range of electrical current which is shown by the active red light. More current is likely to damage the skin. Never turn the current up high enough to cause a stinging sensation which indicates skin being damaged. If .14mA causes stinging then set it to a lower level that is safe for your skin. Think of the .14mA level not as something essential but as a reference point from which you can find the perfect setting for yourself. Comfort Suggestions: If the elastic strap is too tight it will leave ridges on the skin when taken off. You can also sew something soft onto the inside of the band (if a natural fiber then not where the electrodes will be because natural fibers will wick away the electrodes moisture). If your skin becomes irritated where the electrodes touch then maybe you're applying too much current or you should place the electrodes on the ankles instead of the wrists. AC/DC Option: The AC/DC switch allows you to select either Alternating Current for blood electrification with the small wrist electrodes or Direct Current for localized infection treatment with the large electrodes. Making Wrist Electrodes: If you lose yours then any thick 100% cotton cloth can be used to make your own electrodes. The dye in the cloth can be purged out by soaking the cloth in 2/3 bleach and 1/3 water overnight. Here's a drawing showing how to make the electrodes: 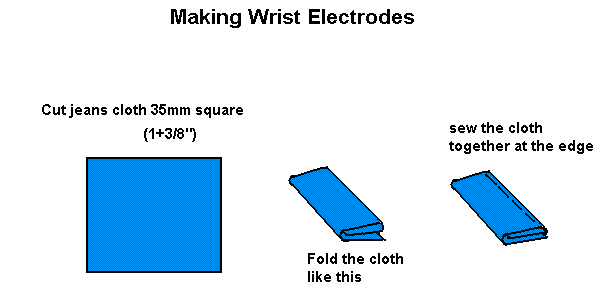 Direct Current Usage Instructions The DC switch setting causes only direct current to exit the wires. It does not alternate in polarity. Use the large electrodes with the DC setting. Direct Current is more effective than alternating current at fighting localized infections. Pad Electrode Usage: You can use the provided 3" pad electrodes (or anything else made of 100% cotton) with the DC setting for treating any injured or infected area of the body (ie: gastritis, hepatitis, stomach virus, infected wound, sore throat, etc) by letting the electricity affect the area of the body that is between the two pads. That is what is meant by "localized treatment". To use them, first put the 3" square cloth pad electrodes into tap water until fully wet, then lightly squeeze out the excess. Connect the black alligator clip onto one pad so that one of the 'jaws' is sandwiched inside the pad. Put the red alligator clip onto the other pad in the same way. Place them on your body so that the infected area is between them. Make sure that the exposed jaw is facing out and not touching the skin. Otherwise it will cause an electrical burn. Hold them in place with elastic or with plastic if you are holding them with your hands. Then with the switch set to DC, and the current control dial fully counter-clockwise, turn the unit on and move the current control dial clockwise until you feel an electrical tingle that isn't strong and isn't too uncomfortable. Don't allow any stinging at all (which is really small spots of skin burning). (Some people don't feel anything due to insensitive nerves or to skin that is a poor electrical conductor. Proceed anyway.) Treat for 15 to 30 minutes a day. Click here to read more about electricity promoting healing. If the skin stings under the alligator clip area then put a small plastic piece (such as what you can tear from the plastic packaging of a loaf of bread) on the skin at that area.
 |