|
The data entry cells on this spreadsheet are all in light blue. The data entry boxes with a medium blue colored heading are essential for the programs calculations. Read my page about EIS to be fully informed before designing a boost bottle. 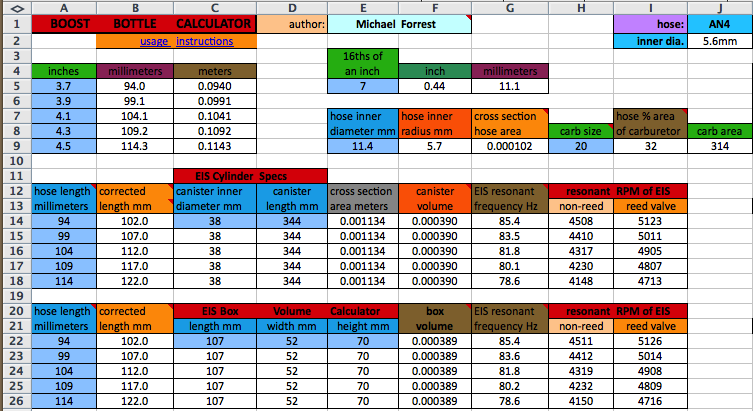 First enter the carb diameter at H9 and then use the "required hose diameter" at the top right hand of EIScalc to figure what hose diameter to use. Put the value you want to use at E9 to see what percentage of the carb volume it has at I9. In this example if I wanted it to work best at 3/8 throttle opening I should use 7.3/16" (11.7mm) ID tubing (so I used 11.4mm). If you only know the inner diameter of the hose in 16ths of an inch then put the number of 16ths you will use in cell E5. Put the number of equivalent millimeters that shows in G5 into E9. If you know the inner diameter in millimeters then just go directly to E9. If you are measuring using inches then enter the range of hose lengths you are considering using into the cells from A5 to A9. Now put the equivalent millimeters showing in B5 to B9 into the cells at A14 to A18 if you are designing a boost bottle from a metal or plastic cylinder, or into cells B22 to B26 if you are making a boxed boost bottle. You can round off the numbers.  2-4 times the volume of your engine is normal for the canister volume. What is important is that you get the resonant RPM you want. You can vary the boost bottle volume and the hose length to manipulate that RPM. Once you have a canister and want to verify its volume then just pour water into it till it fills up to the base of its neck. Then pour it out into a measuring cup. Go to any metric converter on the internet to change ounces to cubic centimeters and then move its decimal point to the left 6 places to get cubic meters. You can enter any combination of numbers at C14 and D14 if making a cylinder (or C22, D22, and E22 if making a box) till the correct volume shows at F14 or F22. For instance 5 ounces equals 147cc which is .000147 cubic meters (which is what this program uses). The resonant RPM for reed and non-reed engines is shown. The trick is to get the dimensions of the box/cylinder and the length of hose that easily fits on your ride to also give you the resonant RPM you want. Sometimes you have to compromise. The resonant RPM for engines with piston-port-only intakes is different because the intake duration is only 1/3rd of each engine cycle which requires a higher resonance to better fit it. Notes for the project can be put into the light blue note boxes to the right. If you have any questions you can see my email by putting the mouse pointer over my name on the program. And if you'd like to enthusiastically share your results and pictures then I can post them on my site as inspiration for others. Project Suzuki I know that my bike ran crappy from 4700 to 5700 RPM, right before it came on the pipe and ran great. So I wanted the EIS boost to be centered right in the middle of that range. Here is the illustration of what I'm saying:  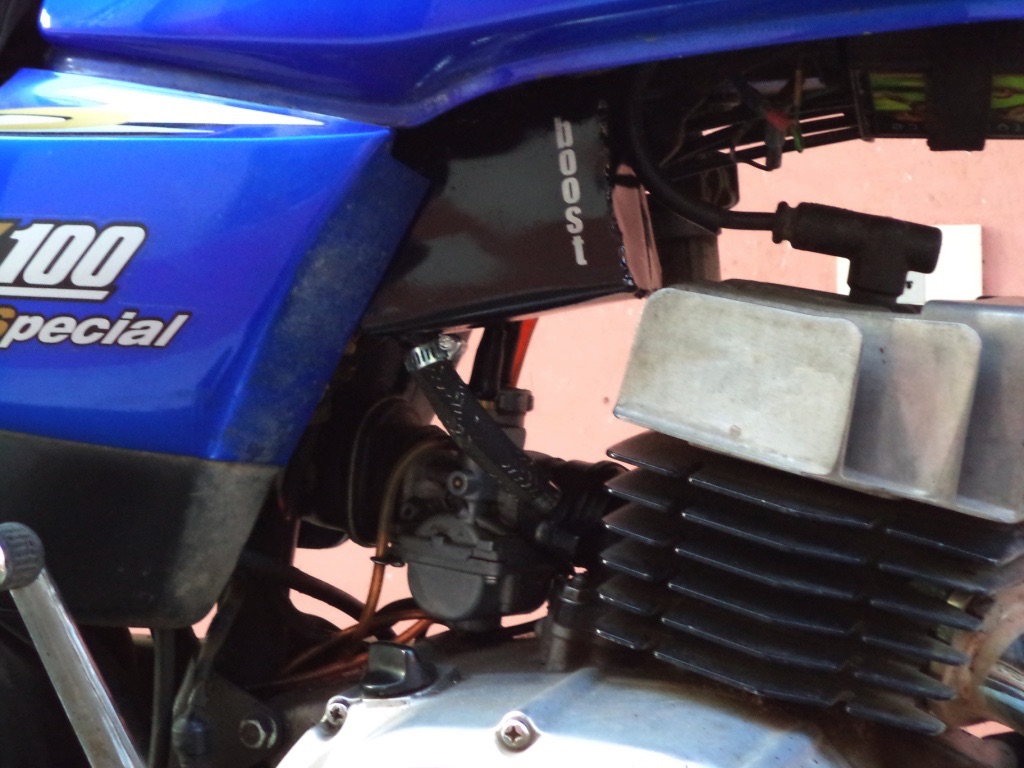 If you don't know the RPM at which your bike has its power dip then just go by the speed at which it happens (buy a bicycle speedometer if needed) and use the Gear RPM Range Calculator at the bottom of the spreadsheet. You need to measure the distance covered by one wheel rotation and put it in meters at D33. The inches to meters converter is at G33. Put the bike up so that the rear wheel turns freely in neutral and take the spark plug out. Hold a small screwdriver into the plug hole so that when you are turning the rear wheel you feel the piston hit the srewdriver at the top of its stroke. Put the bike in the same gear at which you measured the speed and position the rear wheel so the inner tube stem is forward and at a notable position (like in visual line with the top of the swingarm) and so the piston is at the top. Turn the rear wheel for one full turn while counting the number of times the piston touches the screwdriver. Put that number in the D column next to the appropriate gear. Then change the RPM at D32 till the "power dip" speed you measured while riding shows up at the appropriate column for KPH or MPH. 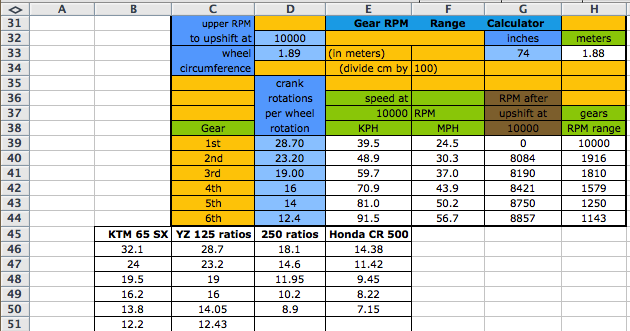 HOME |