|
Now we can calculate the baffle cone but first we need to calculate the belly diameter if you don't already have a size in mind. Go half way down sheet 2 and enter the engine size (cubic centimeters of the cylinder) and projected top-of-powerband RPM. That will tell you the ideal header and maximum belly inner diameter as well as the minimum to maximum inner stinger diameter. The maximum belly diameter at K32 is based on the the number you input at C35, and the diameter at K35 is based on the ideal header diameter at J35. They are the same in this example because the entered diameter at C35 is the same as the suggested diameter at J35.  Most race bikes are OK with a 150mm long single coned baffle. Engines with only a 4 speed gearbox need a longer baffle with a baffle extension or one made of 3 cones which get steeper in angle as they are closer to the end. If the first cone is longer than 100mm then take the final diameter of the first row of calculations at L5 and enter it at A13 for the beginning diameter of the second row of calculations. In that case make sure the two angles at A7 and A15 are the same. To know the baffles exact length we need to input at O16 the stinger size (inner diameter + 2 times the wall thickness) we want to try and then the diameters that are bigger and smaller than that amount in O17 and O18. (Keep in mind that all these diameters are "inner".) O19 will display the number of millimeters to add to the length of the baffle if it were to end at the column showing the next greater diameter than the chosen stinger diameter. So in this case the baffle length would be 198.4mm (100mm 1st cone + 98.4mm 2nd cone). The final 10mm section of the last cone at L12 gave a diameter just a bit smaller than the outer stinger diameter. Putting the final diameter and the one just to the left of it in O17 and O18 you can see here that we need to add the 8.4mm of O19 to the 190mm which gives a total length of 198.4mm. To avoid that complication I just make sure the end of the last cone is the correct stinger diameter at one of the 10mm sections instead of being between two of them. 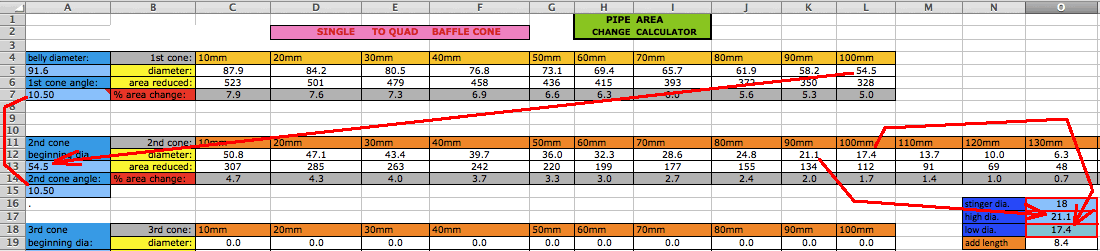 Now write down the % area reductions in the gray rows of sheet 2 for use in sheet 3 (shown here below) for calculating the baffle return wave strength and shape. The result is shown as a graph to the right. 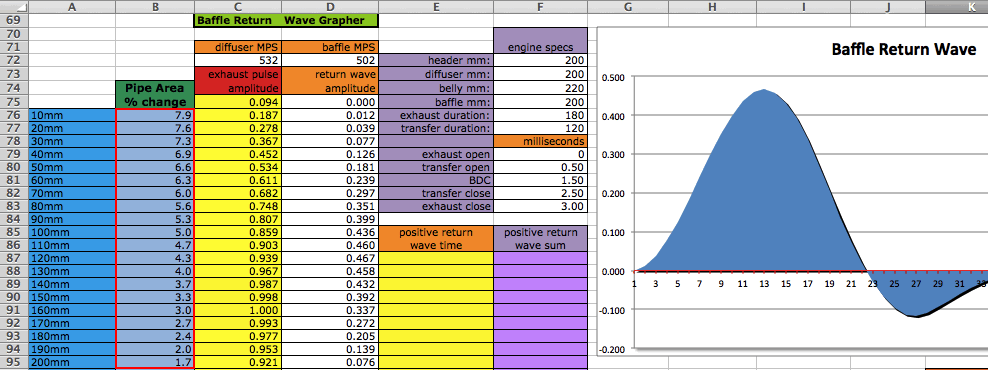 On sheet 3 you can see how the two waves combine in relation to the port timing. You can change the graph RPM, header length, and belly length. Increasing the graph RPM or increasing the header length moves the port timing marks to the left. Increasing the belly length moves the positive baffle wave to the right. 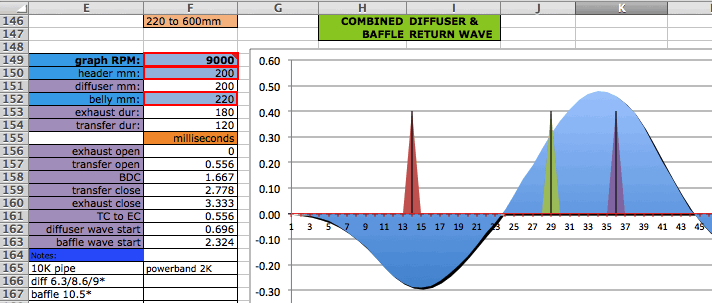 Next go back halfway down sheet 2 of ECcalc where you will start to design the expanding diffuser cone(s). It allows you to make 1 - 4 diffuser cones. (Although you can creatively use it for any number of cones). For an ideal pipe just enter the header diameter from J35 to C35. Otherwise in C35 enter the stock size if you are going to use the stock header, or enter in C35 the inner diameter of piping that is available for purchase as close as possible to the ideal size. When trying different diffuser or baffle cone angles don't let any area change exceed 15% (in rows 41, 51, 61, 71 for the diffuser). Write down the % area changes (in gray rows) from each 10mm section on a piece of paper. These are needed to enter in sheet 3 (starting at B7) so it can calulate the diffuser return wave. 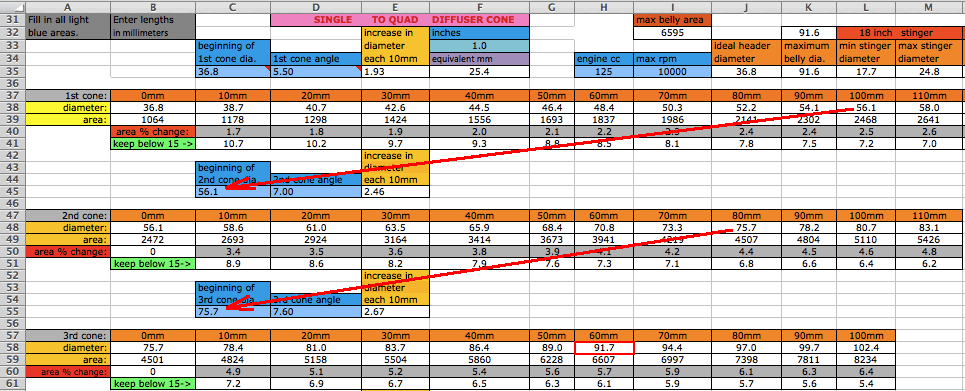 The rows just under the gray ones display the % area change from the beginning of the 10mm section to the end of it which is useful to know the limit of angle before the wave separates from the cone wall, whereas the % area changes we use in sheet 3 (in the gray rows) display the % area change of the 10mm section from the maximum belly area listed at I32. Now enter all the correct data at the top of sheet 3. If you have measured your exhaust gas temperature (EGT) while at or near max RPM then enter the mid-header temperature in Celsius from sheet 1 F15 into sheet 3 F2 and the RPM for that temperature (sheet 1 F14) at sheet 3 F3, otherwise enter your guesstimates for temp/RPM. The temp displayed in A3 is calculated from F2, F3, and the RPM of F137. It lowers the temp by 33 degrees for each RPM 1000 lower. Then enter the pipe lengths in F4 and F6 and the porting durations in F7 and F8. The header/belly values entered here are not used in the wave calculations, only those entered at F150 and F152. Don't forget to enter the exhaust pulse duration at F18. The bigger that is, the longer the return waves are. 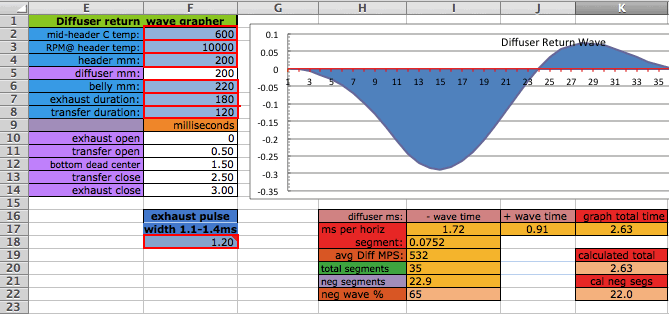 Now enter the area change numbers you had wrote down for the diffuser onto sheet 3 starting at B7. 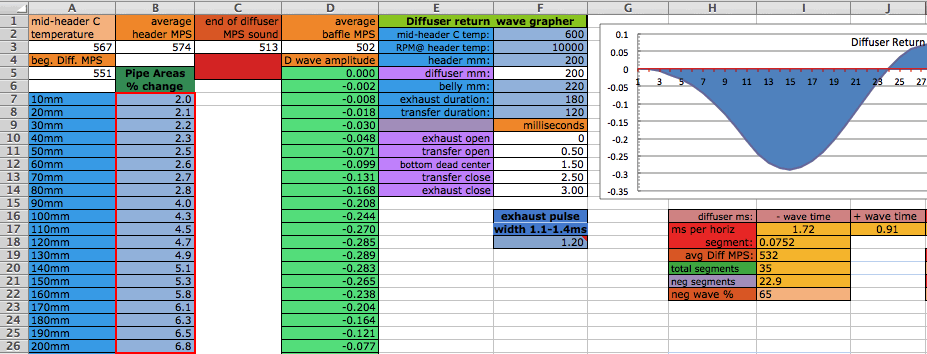 HOME |