|
The graph below shows the range of effect of each of the adjustable parts of a carburetor. This data comes from my jetting calculator. 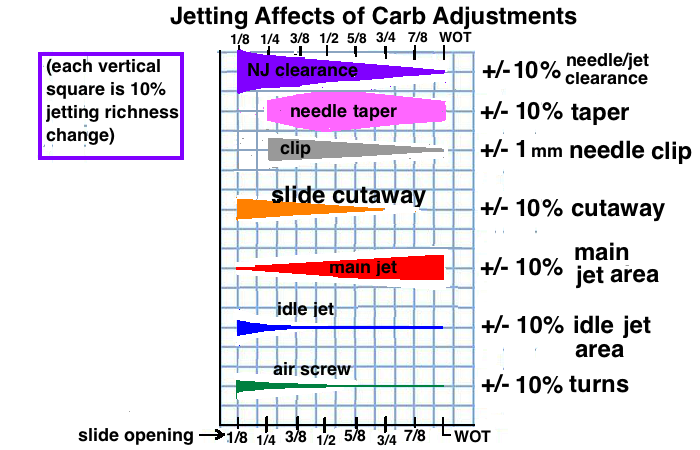 The following is the right order for tuning: FLOAT HEIGHT- First make sure the bowl float turns off the gas inlet valve at the correct float height. The height of the gas in the bowl is important to maintain stability when going over bumps and also has a slight effect on the jetting. On my VM18 a change of 2mm float height required a half turn adjustment on the idle air screw. Usually the float needs to be parallel with the float bowl mating surface when it is just barely closing the inlet valve. This picture shows where you measure the float height. Note that the angle should be just enough for the tang to touch the spring loaded needle without compressing its spring. 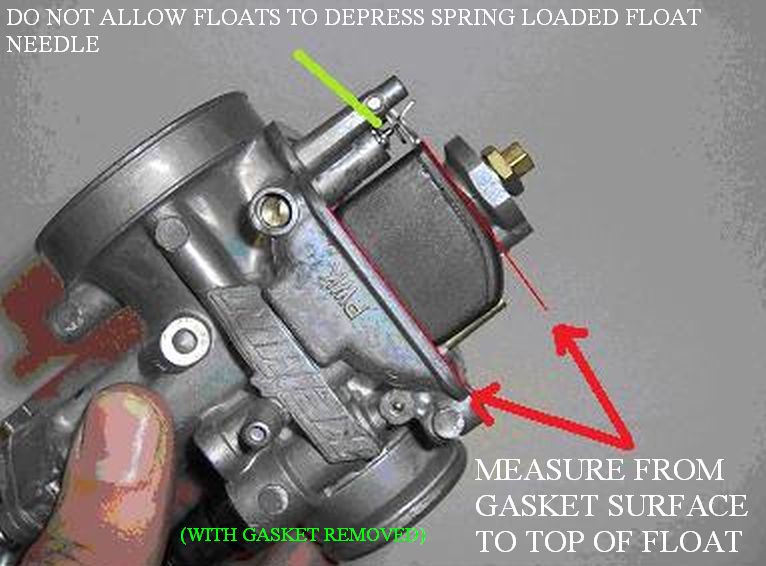 You have to know the manufacturers data for float height or go by one of these two methods: 1) With the gas tank petcock off remove the float bowl. With the carb upright hold the float in its high position with your finger. Turn the tank petcock on and slowly lower the float till gas starts to trickle past the inlet valve. Note that position of the float in relation to the carb body. If the float "arm" is not parallel to the bottom surface of the carb then adjust the tang till that is the position at which the gas flow turns on/off. see drawing below. 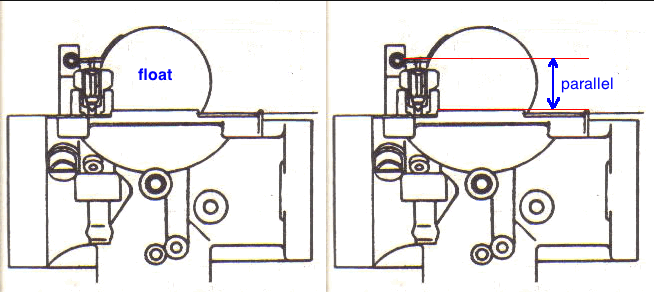 2) Disconnect the carb from the engine, reconnect the fuel line to it with the tank pecock turned on, and tilt the carb backwards and note the angle of the carb when fuel starts to come out of the overflow tube. Most carbs are set between 30 and 45 degrees. It's best to use a protractor to get a more accurate idea of that angle other than just by guessing. If you wheelie or hill climb then you might need the carb to tolerate more angle before overflowing. The lower the float level is, the more angle it will tolerate. PILOT (Idle) JET + AIR SCREW- they control the engine at closed throttle. Adjust the carb slide stop screw till the engine has a slightly high idle speed (10% - 20% higher). Turn the air screw in and then out slowly, listening for what settings the engine runs with the highest speed. Set the screw so that you have the highest idle speed and then turn it slowly clockwise till it just starts to lower the speed. That should result in a 1 to 2 turn air screw position. If less than 1 then you may need a larger idle jet. If more than 2 then you may need a smaller idle jet. I say "may" because the only true test is how the engine runs up to 3/8 throttle. The idle mixture that allows smooth idle and gives the best power is the right one. (Test by going uphill and slowly open the throttle to listen to the exhaust note.) Then turn the slide stop screw till you have a normal idle speed. If you have to make the idle mixture too rich to help compensate for weak throttle response as you crack the throttle open then you either have the needle clip in too high a position or you need a skinnier needle or fatter needle jet (the brass hole the needle slides into). 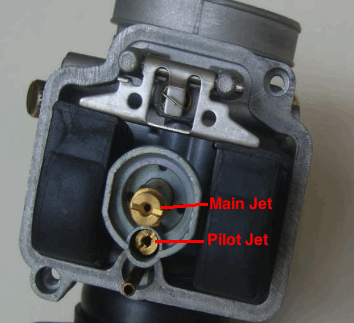 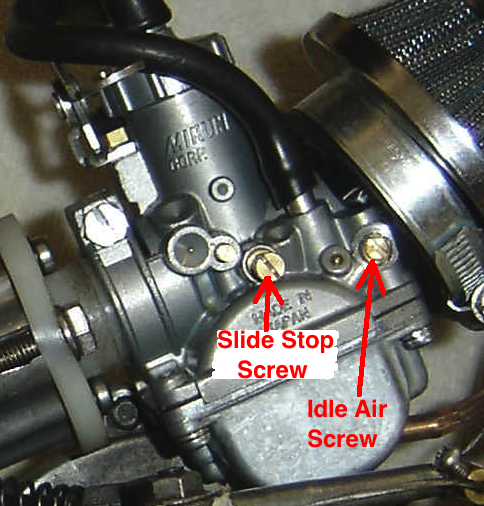  NEEDLE WIDTH & NEEDLE JET HOLE DIAMETER - The spacing between the straight part of the needle and the needle jet determines the gasoline contributing to the idle mixture and the mixture before the needle taper comes into play. That "into play" happens when the slide is open about 1/4 to 1/3 the length/diameter of the bore (the carb size). So until that taper starts to raise above the needle jet then that spacing between the needle and the jet is the most important. If the engine runs too weak there then the needle needs to be skinnier or the jet hole needs to be wider. If running too rich then the needle needs to be wider or its jet needs to be skinnier. "Too rich" also happens due to that jet hole getting wallowed out. (the bigger the engine, the quicker that happens). Sometimes the oblong shape of the hole is visible to the naked eye if it's enough. In that case you need to buy and install a new needle jet or melt solder onto its interior and drill out a new hole (but of course this is the least favorite option but the only one for some old carbs or when the needle jet isn't available). Click here for listings of needles with their taper angles. Click here for my page about needle jets. 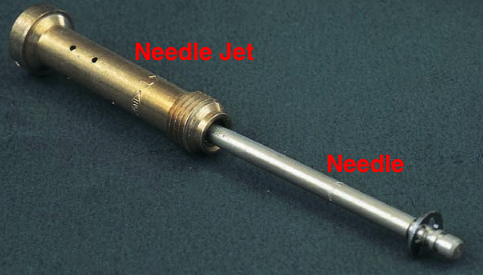 SLIDE CUTAWAY- it affects the fuel/air ratio up to about half throttle. The goal is to feel a crisp acceleration. If the idle jet and needle height are correct but the acceleration is weak then either the needle/needle-jet clearance is too small or the cutaway is too high. You can lower it by putting JBWeld on that edge, putting electrical tape on its outer surface to keep it flat there, and letting it set overnight and then trimming it in the morning. To keep the JBWeld from falling off later you need a very rough metal surface and to cut grooves in the slide that the glue can root into (see picture). If the acceleration feels too rich (somewhat "congested") then you can cut the slide cutaway 1mm higher or drill one or more small holes near the bottom of the slide at the intake side. Instead of lowering the cutaway you can buy another one with a lower cutaway number. Instead of drilling a hole in the slide you can order another one with a larger cutaway number. Actually the needle clearance has a bigger efect than the cutaway but the cutaway is much easier to modify.  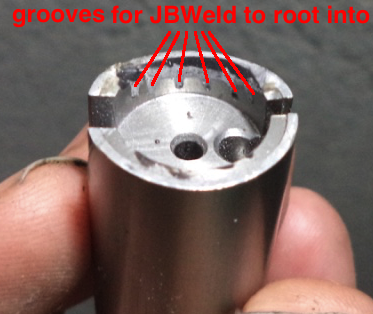 NEEDLE CLIP POSITION - Its effect is mostly up to 3/4 slide open (70% throttle open) and should not be used to adjust right at 3/4 slide open because that should be adjusted with needle taper. Look at these 3 graphs showing the jetting results for 3 consecutive clip positions. Sometimes it's necessary to allow incorrect jetting before 1/2 slide open in order for the rest of the graph to be close to ideal. But if you follw all my suggestions then you can have near perfect jetting thru the whole throttle range. 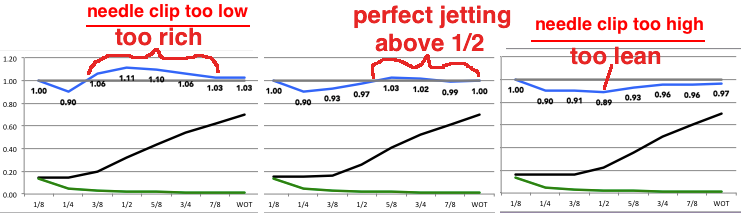 NEEDLE ANGLE- it has its effect from 3/8 slide to WOT. If the mid throttle running isn't correct and needle clip position can't correct it then a needle with a different taper needs to be installed. For richer mid throttle running select a needle with more taper angle. For leaner running select one with less taper angle. The best way to make sure you are noticing how the engine runs at mid throttle is by marking the throttle grip and the throttle body with two white marks (such as with white-out) at half and full throttle. That way you can look and see what position the throttle is at while riding. Going uphill (select the hill angle according to engine size) at a mid throttle position and then cracking open the throttle will produce a "bog" (low power) if the needle is too lean. It will want you to slowly open the throttle to maintain power. If too rich then the exhaust note will sound congested and irregular and the engine will clear out with good power when you crack the throttle open. You can use my jetting calculator to test different needles till you find one that gives a good jetting graph.  NEEDLE JET SHROUD - Mikuni and Keihin use half circle shrouds that affect the suction at the neeedle jet. If there is too much flow area between the needle and needle jet (requiring too lean an idle jet) then you have the option of lowering the shroud instead of finding a fatter needle or a skinnier needle jet. This graph tells all. Lowering the shroud leans out the mixture. My free spreadsheet has a calculator for this at its bottom right. 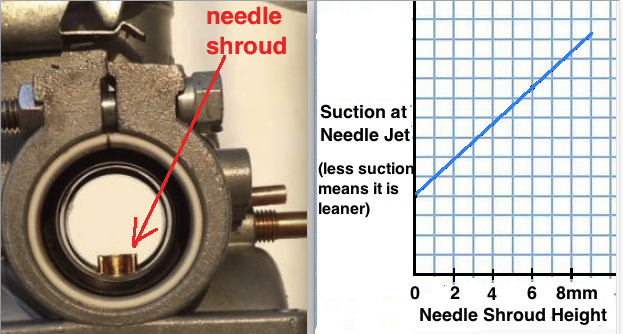 Dellorto has full circle shrouds that don't increase the suction on the needle jet like the half shrouds do. So at closed and nearly closed throttle the air flow near the bottom of the venturi is the highest and so higher shrouds remove the jet from the highest air velocity which of course will lower gasoline flow at low throttle settings. The lower the shroud is, the higher the fuel flow at closed or nearly closed throttle. If you have a Dellorto and notice a weakness off idle then try shortening the full circle shroud. This is from the Dellorto manual: 
MAIN JET- it has a progressively stronger effect from closed (1% effect) to full open throttle but you test it at full throttle. In general if the ratio is too rich then the engine runs irregularly and if too lean then it runs really smooth but under-powered and too hot. Jetting For Power - The best way to select a main jet is by what gives the best power, but how can we determine that without a dyno? I think the best way is by acceleration tests, how long it takes to go from one point to another on a flat road by using a stopwatch. Jetting should never be so lean that it gets the piston too hot and seizes. (read more) Too high compression or too advanced ignition can also cause over heating. The more mineral oil an engine oil has, the more oil will burn onto the piston top. Group 1 mineral oil is much worse than group 2 mineral oil. Castor oil also will leave deposits. Synthetic may not leave any deposits. The oil on the piston top should be baked black except for near the transfers and boost port (although this depends on transfer port roof angle). Some oil could possibly be baked light brown onto the piston underside with little or no black color. Destroying plugs to look at the base of the ceramic is a waste of time because the dark ring there depends as much on the plug heat as on the jetting. The colder the plug is, the skinnier the dark ring. Jetting is about giving the engine just enough fuel for the best power without overheating the piston so it is important to look at the piston underside after your final main jet selection and trial runs. What complicates this topic is that tuning also includes finding the best ignition timing which will change with different types of engine oil because I've found that engine oil affects how fast the combustion happens. Click here to see my video on this topic of combination tuning. 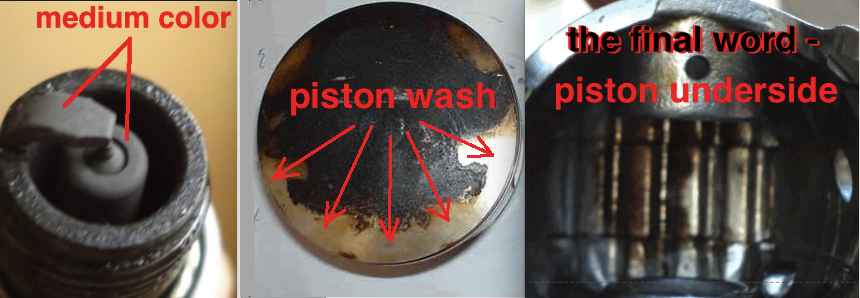 You can not go by the available spark plug color charts because the color is lighter for water cooled engines than for air cooled ones and lighter for low compression engines than for high compression ones. All of those charts are for 4 strokes any way. I just try different main jets and choose the one that allows the best power (since being too lean or too rich will rob engine power), remaining with the richer one when two jets seem the same. Also you can jet for highest cylinder head temp. The graph on the left doesn't show that but it is a graph from an airplane engine at partial throttle. The graph to the right is from my personal testing which shows peak power also creates peak temp. Just make sure on flat ground that your air cooled engine doesn't get above 300 degrees F, otherwise you'll need to lower the compression or increase the main jet size.  From the instructions of the JD Jetting spreadsheet (no longer sold) there is this which backs me up when I say that the needle and main jet have some effect at 1/8 slide open: "Needle diameter near the tip affects full throttle jetting and this is taken into account. The main jet also interacts very slightly down as low as 1/8 throttle." "The needle straight diameter also has an effect at closed throttle. The pilot jet will overlap with the needle straight diameter as the throttle is slowly opened. A fast or inconsistent idle when the bike is hot can be a result of too large (lean) of a needle straight diameter or a pilot jet too small." My Jetting Videos: About 2 Stroke Jetting, especially needles Benefits of a Carburetor Jetting Calculator Using the Jetting Calculator to find a good substitute needle. (example of a PWK 28 carb that doesn't offer needles with a small enough taper angle) Using Jetting Calculator #5 Click here to see all my 2 stroke videos I have looked at the promos for other jetting calculators and think my Jetting Calculator is the best because it's usable with all carbs and is fairly easy to use. Also it's final graph is not just a comparison to previous jetting but shows you how its full range jetting compares to the ideal fuel/air ratio. This is the best guide for reading a plug for other things besides jetting. Jetting should only be relative to power and excess piston heat so the plug color only gives you a faint idea about jetting, whether it is way too lean (little to no color) or way too rich (black). 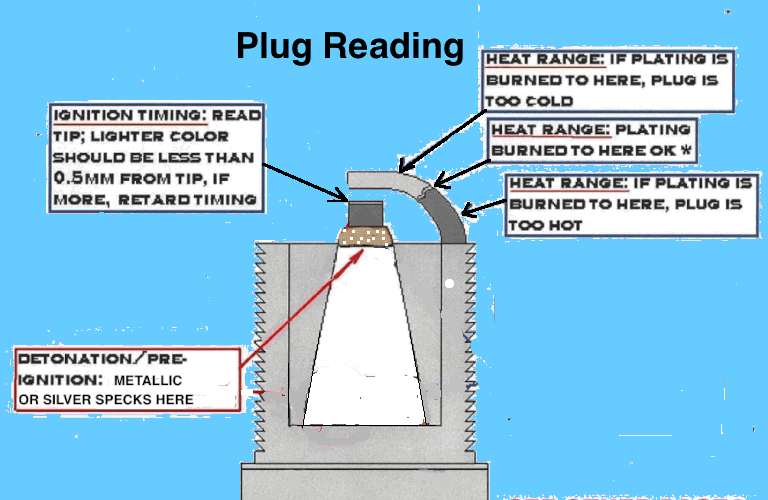 Click here for my page about reading the plug. Proceed to my page about Jetting Calculator HOME |
